Tasty Boston Cream Treats

Featured in: Desserts to Satisfy Every Craving

Turn the traditional Boston cream pie into cute personal cupcakes. Each bite offers soft vanilla cake, handcrafted custard filling, and silky chocolate topping - giving you the famous dessert in a smaller package.

A woman in a kitchen with a stove and oven.
Updated on Thu, 24 Apr 2025 16:58:05 GMT
A close-up of yellow cupcakes with glossy chocolate frosting arranged on a light blue plate. Pin it
A close-up of yellow cupcakes with glossy chocolate frosting arranged on a light blue plate. | cookingkitchn.com

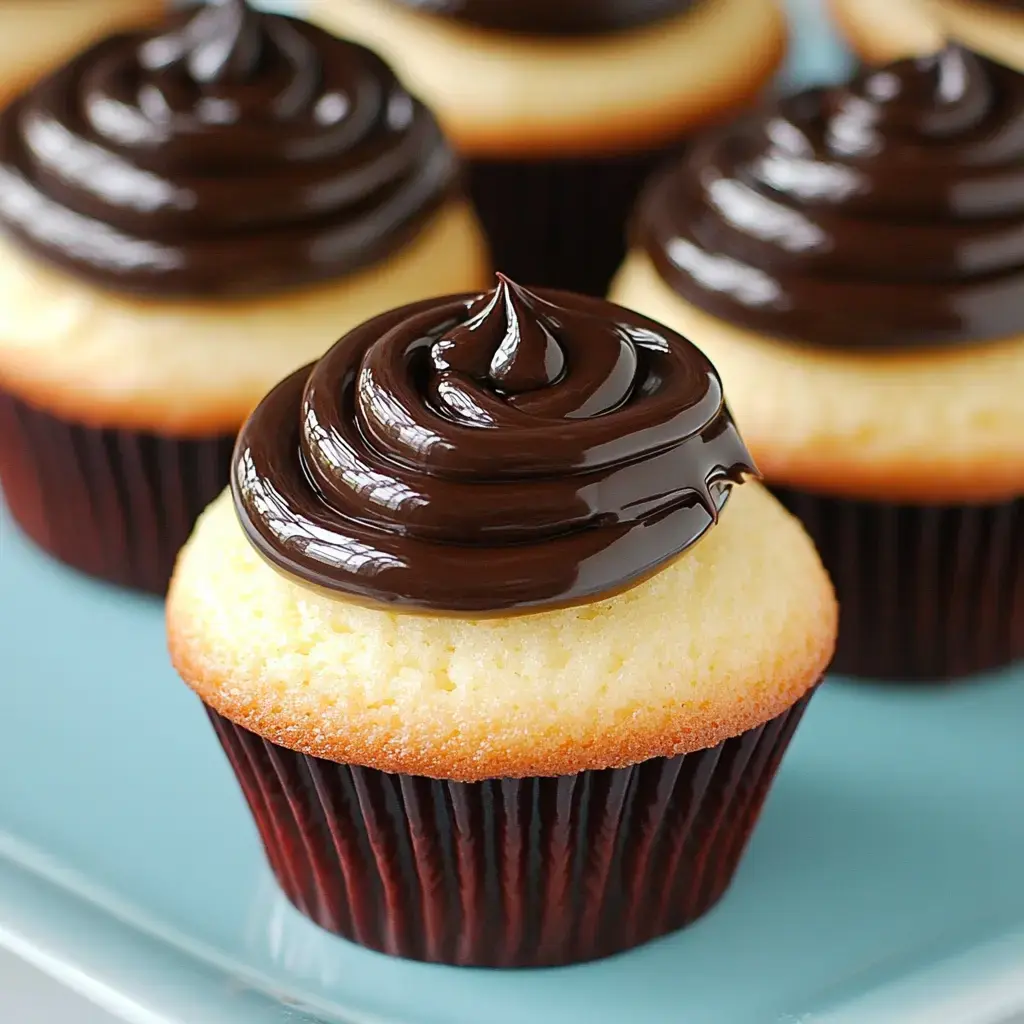
Need a tasty treat that'll blow everyone away? These handcrafted mini Boston creams blend soft vanilla sponge, velvety custard filling, and decadent chocolate topping all in one bite-sized package. My kids constantly ask for seconds of these little delights, and I'm sure your family will be hooked too!

What Makes These Treats Outstanding

My no-fuss mini Boston creams pack all the yummy elements of the traditional dessert but in a handy, grab-and-go format. These handcrafted goodies always get folks talking at gatherings and guess what? They're easier to whip up than most people realize! The mix of airy cake, silky filling, and shiny chocolate makes these little treats totally addictive.

All Your Ingredients

  • For Fluffy Base: Premium unsalted butter, granulated sweetener and pure vanilla extract create incredibly soft mini Boston creams.
  • Silky Center: The heart of fantastic handcrafted mini Boston creams is velvety custard thickened to perfection.
  • Glossy Coating: Luxurious ganache with a splash of corn syrup gives these mini Boston creams that fancy bakery look.
  • Real Vanilla: Brings wonderful taste to both the sponge and filling.
  • Sweetener and Fat: They're what makes your cakes wonderfully airy.
  • Glossy Trick: A tiny bit of corn syrup transforms the topping into something spectacular.

Baking Brilliance Step By Step

Tackle The Custard First
This is the soul of mini Boston creams! Mix egg yolks, granulated sweetener and cornstarch together, gradually pour in warmed milk, then cook until it's wonderfully thick.
Create Your Cakes
For truly amazing mini Boston creams, beat your butter and sugar thoroughly, add eggs one by one, then switch between adding dry stuff and milk.
Prepare The Chocolate
Warm up some cream, pour it over chocolate chunks, stir in corn syrup for that gorgeous handcrafted mini Boston creams finish.
Complete Your Masterpiece
Cut the middle from each cake, stuff with custard, spread ganache on top, then let them cool in the fridge before you dig in.

Secrets To Amazing Results

Want stunning handcrafted mini Boston creams every single time? Really work that butter and sugar mixture—it'll take around 5 minutes. When adding custard to your mini Boston creams, grab a pastry bag for tidy, professional-looking centers. Cool your ganache just enough so it's perfect for making those gorgeous swirls on your little treats.

Great For Every Occasion

These mini Boston creams fit right in at backyard cookouts or fancy dinner parties. The classy appearance of these handcrafted goodies always gets people talking, and nobody can resist that classic flavor combo found in mini Boston creams.

A close-up of a partially eaten vanilla cupcake topped with rich chocolate frosting, with other cupcakes slightly blurred in the background. Pin it
A close-up of a partially eaten vanilla cupcake topped with rich chocolate frosting, with other cupcakes slightly blurred in the background. | cookingkitchn.com

Delightful Journey To Dessert Excellence

Getting these mini Boston creams just right took me several attempts, but now I can share this reliable recipe with you. These no-fuss treats show that persistence pays off, and once you've tasted these handcrafted mini Boston creams, you'll understand why they're worth all the effort I put into perfecting them.

Frequently Asked Questions

→ Can I make these ahead of time?

Sure thing, they stay good in the fridge up to 4 days. Just let them warm up before eating for the best flavor.

→ Why add corn syrup to ganache?

The corn syrup makes your ganache look prettier and stay shiny even after it hardens.

→ Can I freeze these cupcakes?

I wouldn't freeze them because the custard might get weird. They taste way better fresh.

→ Why temper the eggs for pastry cream?

You need to mix hot milk into eggs slowly so they don't cook too fast and turn lumpy.

→ Can I use a different piping tip?

For sure, try Wilton 2D or 1M tips if you want to make those pretty rose swirls on top.

Mini Boston Cream Treats

Enjoy tiny Boston cream pies as cupcakes! Soft vanilla treats stuffed with custard and finished with dark chocolate.

Prep Time
35 Minutes
Cook Time
15 Minutes
Total Time
50 Minutes
By: Sophia

Category: Sweet Delights

Difficulty: Difficult

Cuisine: American

Yield: 12 Servings (12)

Dietary: Vegetarian

Ingredients

01 For cupcakes: 6 tbsp soft unsalted butter at room temp.
02 3/4 cups white sugar.
03 6 tbsp tangy sour cream.
04 2 tsp pure vanilla extract.
05 3 large whites from eggs.
06 1 1/4 cups regular flour.
07 2 tsp baking powder.
08 1/4 tsp table salt.
09 6 tbsp fresh milk.
10 2 tbsp plain water.
11 For cream filling: 2 egg yolks.
12 6 tbsp granulated sugar.
13 1 1/2 tbsp cornstarch.
14 1 cup + 2 tbsp milk.
15 1 tbsp salted butter.
16 1 tsp vanilla extract.
17 For topping: 12 oz semi-sweet chocolate chips.
18 2 tbsp light corn syrup.
19 3/4 cup + 2 tbsp heavy whipping cream.

Instructions

Step 01

Get your oven hot at 350°F and put paper liners in your cupcake tin so they'll all bake evenly.

Step 02

Mix the butter and sugar for about 4 minutes until it looks super fluffy and gets lighter in color.

Step 03

Stir in the sour cream with vanilla, then gently fold in the egg whites, adding half at a time.

Step 04

Put all dry stuff in one bowl, and mix the milk with water in a different cup.

Step 05

Add some dry mix then some milk mix to your batter, back and forth until it's all mixed up good.

Step 06

Pour batter into each liner until half full and let them bake around 15-17 minutes or until a toothpick comes out mostly clean.

Step 07

Start the filling by beating egg yolks in a bowl while you warm up sugar, cornstarch and milk in a pot.

Step 08

Slowly pour some hot milk into the egg mix while stirring fast, then dump it all back in the pot and cook till thick.

Step 09

For the top, pour steaming cream onto chocolate and corn syrup, wait a minute, then stir until smooth.

Step 10

After everything's cooled down, cut little holes in your cupcakes and spoon the cream inside.

Step 11

Swirl the chocolate mix on top like a rose, starting from the middle and going around the outside.

Step 12

Pop them in the fridge until you want to eat them, but let them warm up a bit before serving.

Notes

  1. Tastes way better when not too cold.
  2. Stays fresh in the fridge for 3-4 days.
  3. Looks fancy enough for special occasions.
  4. Brings bakery quality straight to your kitchen.

Tools You'll Need

  • Tin for cupcakes.
  • Mixer with power.
  • Decorating bags.
  • Tool to remove cupcake centers.

Allergy Information

Please check ingredients for potential allergens and consult a health professional if in doubt.
  • Milk products like butter, cream and sour cream.
  • Eggs in both yolks and whites.
  • Flour contains wheat.

Nutrition Facts (Per Serving)

It is important to consider this information as approximate and not to use it as definitive health advice.
  • Calories: 364
  • Total Fat: 18.8 g
  • Total Carbohydrate: 46.2 g
  • Protein: 5.6 g