
 Pin it
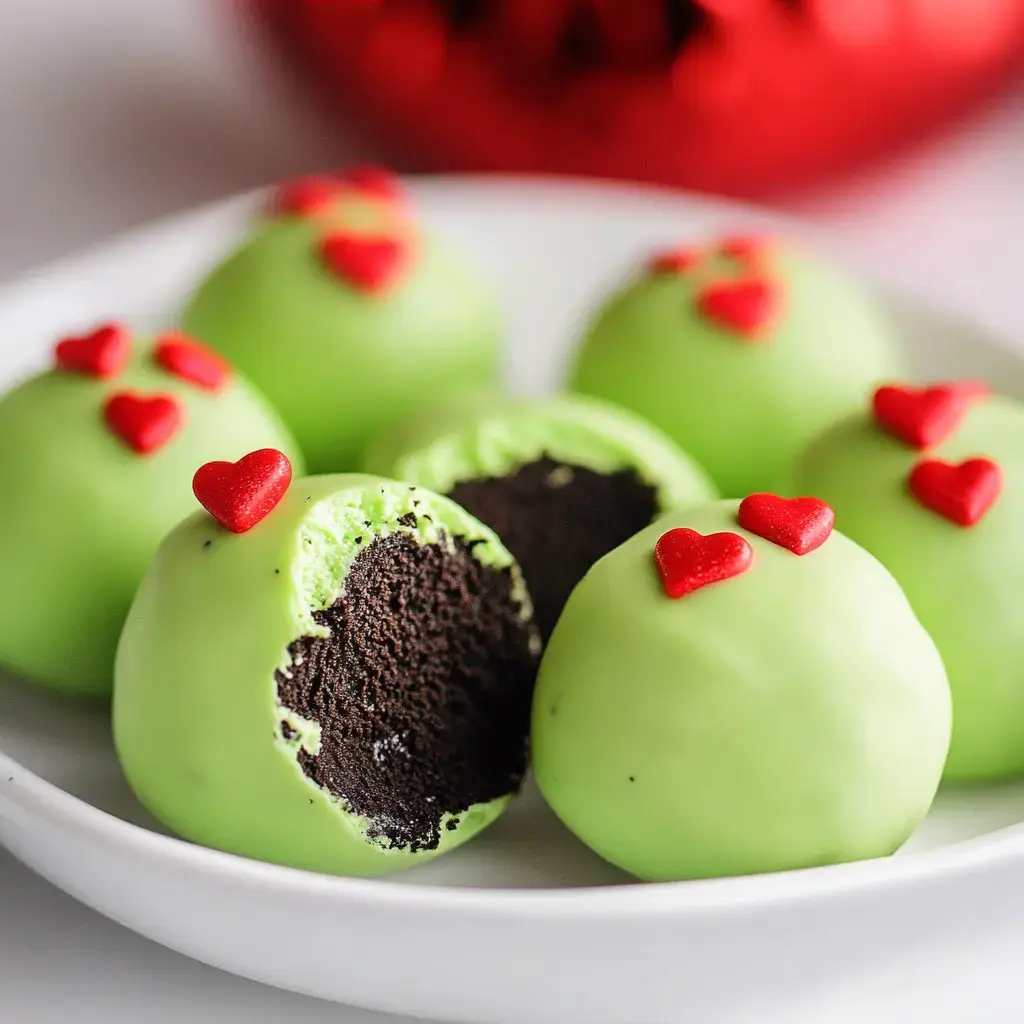
Looking for holiday goodies that'll leave everyone feeling merry? Check out these Grinch Christmas Truffles! They're smooth, no-bake treats covered in bright green coating with cute red hearts on top. They work great for gatherings, treat exchanges, or just to bring some Christmas cheer!
What You'll Adore About This Process
The coolest thing? You just need 5 items and no baking know-how to create these cute treats! Kids can join in the fun too (though expect some green-stained fingers), and they always vanish first from holiday sweet tables. They're also a fantastic activity while enjoying the Grinch film!
What You'll Need
- Oreos: 1 standard pack (36 cookies) - don't remove anything!
- Cream Cheese: 8 oz soft whipped version
- Almond Bark: 16 oz white for dipping - it melts so smoothly
- Green Food Coloring: Get the gel kind, not the liquid one - you'll thank me later
- Red Hearts: Around 30-40 small decorations
Let's Create Some Wonder!
- Pulverize The Cookies
- We'll start by turning Oreos into fine dust. Throw them in your food processor until they look like dark chocolate sand. Don't have a processor? Just toss the cookies in a plastic bag and smash them with a rolling pin. Make sure they're super fine - we don't want lumps in our truffles!
- Mix Up The Filling
- Here comes the messy bit - dump those cookie bits into a large bowl with your soft cream cheese. Time to get messy! Combine everything until it's totally mixed. It's done when it looks like thick chocolate dough and sticks together when pressed. If it's too gooey, cool it in the fridge for 10 minutes.
- Shape Your Balls
- Take your cookie scoop (or just use a tablespoon) and start forming portions. Roll each between your hands to create smooth balls - about ping pong ball size works best. Place them on a parchment-covered baking sheet. Quick tip: if stuff sticks to your hands, dust them with a little powdered sugar!
- Cool Them Down
- Now these balls need to harden before their green dip. Stick the whole tray in the fridge for at least an hour, or if you can't wait, 30 minutes in the freezer will work too. They should feel solid when touched.
- Get Your Coating Ready
- While they're cooling, let's prep the coating. Break your almond bark into pieces and put them in a microwave-safe dish. Heat in 30-second bursts, mixing thoroughly each time. Don't rush or you'll ruin the chocolate! Once smooth, add green coloring gradually until you reach that perfect Grinch green.
- Time For Dipping!
- This is where the magic happens! Drop each cold ball into the green mixture. Use a fork to roll it around, then lift it out and tap off extra coating. You want even coverage - not too thick or thin. Gently slide each one back onto the parchment.
- Place The Hearts
- Work fast! While the coating's still wet, stick a red heart on each truffle. This is when each treat gets its Grinch character - make those hearts look good!
- Final Setting
- Back to the fridge they go! Give them about 30 minutes to fully harden. They're ready when the coating feels firm and not sticky. Try to save some for others!
Why These Stand Out
You know that one wow-factor holiday treat everyone needs? This is it! These truffles aren't just cute - they're little chunks of smooth, chocolatey goodness that look straight from a Dr. Seuss book. Even better? They're almost impossible to mess up. If you can smash cookies and form balls, you can make these beauties. And seeing people smile when they notice that tiny red heart? That's what Christmas is all about!
Tweak It Your Way
The greatest thing about these treats? You can easily change them up! Try different Oreo types - the mint ones are great for extra holiday spirit, or go for birthday cake flavor for something different. Not into green? Make them other colors for different celebrations (though they wouldn't be Grinch truffles anymore!). Some people like to add white chocolate drizzles on top for a snowy look. Just like how the Grinch's heart grew three sizes, your creative ideas can grow too!
Turn It Into A Group Activity!
Think about this: you, your buddies, and a Grinch movie marathon while making these snacks! Create a small truffle station with bowls of melted coating and toppings. Everyone can try dipping and decorating - sure, it might get messy, but that's part of the fun! Play some holiday tunes, make some hot chocolate, and enjoy the whole experience. Just maybe wear something to protect your clothes (that green coloring is serious!) and keep plenty of paper towels nearby.
 Pin it
Tips For Perfect Results
Let me share some truffle lessons from many batches (and a few tasty mistakes). First thing, your cream cheese must be REALLY soft - leave it out for an hour before you start. When melting the almond bark, go slow and steady. Rushing leads to clumpy coating, and nobody wants that! If your coating gets too thick during dipping, warm it for 10 seconds in the microwave. And my favorite trick: keep a damp paper towel handy to clean your fingers between rolls - it keeps the truffles looking smooth!
Storing Your Goodies
Made too many (is that possible?)? These little treats will stay good in the fridge for up to two weeks in a closed container. Just put wax paper between layers so they don't stick together. Taking them to a gathering? Pack them the same way and keep them cool until it's time to serve. They even freeze well for up to three months - just thaw them in the fridge overnight when you want to eat them. Want to give them as presents? Put them in pretty holiday boxes or clear bags, add a ribbon, and watch people light up brighter than Christmas lights!
Frequently Asked Questions
- → Need different coating?
White chocolate is good. Be careful melting. Add coloring gradually. Can be challenging. Definitely worth trying.
- → How keep em good?
Store tightly closed. Keep refrigerated. Stays fresh one week. Avoid heat. Layer with parchment.
- → Want no milk stuff?
Go for dairy-free cream cheese. Use dark chocolate coating. Check cookie ingredients. Flavor might change. Looks just as nice.
- → Make em early?
Up to three days works. Store in fridge properly. Fresher tastes better. Worth waiting a bit. Makes your life easier.
- → No food mixer here?
Smash in plastic bag. Use a rolling pin. Needs extra effort. Gets equally smooth. Just needs some strength.
- → Getting too soft?
Refrigerate longer. Dip them quickly. Keep cold always. Follow steps carefully. Patience pays off.
- → Taking em places?
Store in cooler. Use sturdy container. Keep ice packs nearby. Drive carefully. Good packing matters.
- → Need em faster?
Get pre-made crumbs. Fast mixing works. Prepare stuff beforehand. Still needs cooling. Cooling can't be rushed.
- → Making big batch?
Doubling works great. You'll need more room. Longer cooling time. Keep everything cold. Makes plenty more.
- → Want more taste?
Try adding mint. Switch cookie types. Combine varieties maybe. Different decorations. Keep the green color though.
- → Coating too thick?
Add a bit of oil. Shake off extra. Work quickly. Keep coating warm. Avoid making it runny.
- → Balls not smooth?
Mix it longer. Cool between rolling. Use slightly warm hands. Make them equal size. Patience works best.
Conclusion
Enjoy these? Maybe try dark chocolate balls later. Or whip up fun cake pops. Both great for gatherings.